Drying and storing fresh garden herbs is an ancient practice that continues to be a cornerstone of sustainable home gardening. Beyond the immediate joy of harvesting, preserving your bounty allows you to extend the season’s flavors, ensuring a steady supply of aromatic herbs for culinary creations, medicinal remedies, and fragrant home uses throughout the year. This ultimate guide will take you through the essential techniques, scientific principles, and expert tips to transform your fresh garden herbs into long-lasting, flavor-packed treasures.
From the delicate art of air drying to the efficiency of modern dehydrators, we’ll explore various methods, discuss their pros and cons, and equip you with the knowledge to select the best approach for different herb varieties. Understanding the “why” behind each “what” will empower you to make informed decisions, avoid common pitfalls, and achieve professional-grade results right in your own home. Prepare to unlock the full potential of your herb garden and savor its essence long after the growing season ends.
Understanding Herb Preservation: The Science Behind It
The fundamental principle behind drying herbs is simple: removing moisture to inhibit microbial growth and enzymatic activity. Fresh herbs, vibrant and full of life, contain a high percentage of water, typically 80-90%. This water content is essential for plant metabolism but also creates an ideal environment for bacteria, yeasts, and molds to thrive, leading to spoilage. By reducing the moisture content to below 10-15%, we effectively create an inhospitable environment for these organisms, halting the decomposition process.
The Role of Dehydration
Dehydration is the process of removing water. When herbs dry, their cell walls break down slightly, and water molecules evaporate. This concentration of flavor compounds and essential oils is what gives dried herbs their potent aroma and taste. Historically, this was achieved by natural exposure to sun and air. Today, controlled environments like dehydrators or ovens accelerate this process, ensuring even drying and minimizing the risk of spoilage before adequate dryness is achieved.
Preserving Essential Oils and Flavor
While drying preserves herbs, the challenge lies in doing so while retaining their delicate essential oils, which are responsible for their distinctive flavors and aromas. These oils can be volatile, meaning they evaporate easily, especially with excessive heat or prolonged exposure to air and light. Therefore, gentle, consistent drying at lower temperatures, followed by proper storage, is crucial to maintain the quality and potency of your dried herbs.

Harvesting Herbs for Optimal Drying
The quality of your dried herbs begins long before the drying process itself – it starts with proper harvesting. Timing and technique play a crucial role in maximizing the flavor and potency of your botanical bounty. Understanding the plant’s life cycle and environmental factors will ensure you capture the peak essence of your herbs.
When to Harvest: The Golden Rules
- Morning Glory: Harvest herbs in the late morning, after the dew has evaporated but before the sun’s intense heat begins to diminish their essential oils.
- Before Flowering: For most leafy herbs (like basil, mint, oregano), harvest before they begin to flower. Flowering often signals a shift in the plant’s energy from leaf production to seed production, which can result in a less potent and sometimes bitter flavor in the leaves.
- Mature, Healthy Growth: Select mature, robust leaves and stems that are free from pests, diseases, or any signs of wilting.
- Regular Pruning: Consistent harvesting actually encourages more bushy growth, providing a continuous supply of fresh herbs throughout the growing season.
How to Harvest: Techniques for Success
- Sharp Tools: Use clean, sharp scissors or pruning shears to make clean cuts. This prevents damage to the plant and promotes quicker healing.
- Selective Cutting: For perennial herbs, harvest no more than one-third of the plant at a time to ensure its continued health and productivity. For annuals, you can be more aggressive, especially towards the end of the season.
- Handle with Care: Be gentle when handling harvested herbs to avoid bruising, which can release essential oils prematurely and lead to discoloration.
Initial Cleaning and Preparation
After harvesting, a light cleaning is often necessary. Gently rinse herbs under cool running water to remove any dirt, dust, or small insects. Pat them thoroughly dry with a clean kitchen towel or use a salad spinner to remove excess moisture. Any remaining water can lead to mold during the drying process, so ensure they are as dry as possible before proceeding to your chosen drying method.

Traditional Air Drying: The Classic Method
Air drying is arguably the oldest and simplest method for preserving herbs, relying on natural ventilation and low humidity to gently remove moisture. It’s an energy-efficient and highly effective technique, particularly suited for herbs with lower moisture content and sturdy stems. This method often yields herbs with intensely concentrated flavors, reminiscent of old-world charm.
The “Why” Behind Air Drying
Air drying works by allowing moisture to slowly evaporate from the herb leaves into the surrounding air. The key is a balance of good air circulation and relatively low humidity. Too much humidity will lead to mold growth, while insufficient air circulation will trap moisture around the herbs, hindering the drying process and also promoting mold. The slow, gentle nature of air drying helps to preserve the volatile essential oils, contributing to a richer flavor profile.
Step-by-Step Procedure
- Bunching: Gather 5-10 stems of the same herb into a small bundle. Avoid making bundles too large, as this can impede airflow to the inner stems and leaves, leading to uneven drying and potential mold.
- Securing: Tie the stems together tightly with twine, rubber bands, or a twist tie. Ensure the tie is snug, as stems will shrink slightly as they dry.
- Hanging: Hang the bundles upside down in a warm, dry, well-ventilated area, away from direct sunlight. Ideal locations include a pantry, attic, kitchen corner, or even a closet with good air circulation.
- Protection (Optional): For dusty environments or to protect from insects, you can loosely cover the bundles with a paper bag. Punch holes in the bag for ventilation.
- Monitoring: Check the herbs periodically. The drying time varies greatly depending on the herb type, humidity, and temperature, typically ranging from 1 to 4 weeks.
Tips for Success and Common Pitfalls
- Ideal Conditions: Aim for a temperature between 60-70°F (15-21°C) and humidity below 60%.
- Herbs Best Suited: Air drying is perfect for hardy, low-moisture herbs like rosemary, thyme, oregano, marjoram, sage, and bay leaves.
- Herbs to Avoid: High-moisture herbs like basil, mint, and cilantro are prone to mold when air-dried, often turning black and losing flavor. For these, consider dehydrators or oven drying.
- Mold Alert: If you see any signs of mold (fuzzy white or black spots), discard the entire batch immediately. It’s not safe to consume.
- Don’t Rush It: Patience is key. Rushing the process by exposing herbs to too much heat can “cook” them, causing flavor loss.

Modern Dehydrators: Efficiency and Control
For gardeners seeking a more controlled, efficient, and consistent method for drying a wider variety of herbs, a food dehydrator is an invaluable tool. Dehydrators offer the precision to dry herbs quickly and thoroughly, minimizing the risk of spoilage and maximizing flavor retention, especially for delicate or high-moisture varieties.
The “Why” Behind Dehydrator Drying
Food dehydrators work by circulating a continuous flow of warm, dry air over the food items. This creates an optimal environment for moisture evaporation while maintaining a low enough temperature to preserve nutrients and volatile compounds like essential oils. The controlled temperature and airflow prevent uneven drying, browning, and mold growth, which can be challenges with natural air drying, particularly in humid climates.
Step-by-Step Procedure
- Preparation: Wash and thoroughly dry your herbs. Remove any thick stems and arrange single leaves or small sprigs in a single layer on the dehydrator trays, ensuring good airflow around each piece. Do not overcrowd the trays.
- Temperature Setting: Set your dehydrator to the lowest temperature setting, typically around 95-105°F (35-40°C). Higher temperatures can cause herbs to “cook” and lose flavor and color.
- Drying Time: Drying time varies significantly depending on the herb’s moisture content, thickness, and ambient humidity, usually ranging from 1 to 4 hours. Delicate herbs like dill or cilantro might dry faster than thicker-leafed herbs like sage.
- Monitoring and Rotation: Check the herbs every hour or so. Rotate trays if your dehydrator doesn’t have even heat distribution.
- Testing for Dryness: Herbs are fully dry when they are brittle, crumble easily between your fingers, and show no signs of flexibility or moisture.
Tips for Success and Common Pitfalls
- Optimal Temperature: Always err on the side of lower temperatures for herbs. While some fruits can handle higher heat, herbs are more delicate.
- Even Layering: Overlapping herbs on trays will lead to uneven drying. Take the time to spread them out.
- Mixed Batches: Avoid drying herbs with very different moisture contents or strong aromas together, as flavors can transfer.
- Don’t Over-Dry: While dryness is key, excessive drying can make herbs turn to dust and lose some potency. Aim for brittle but not pulverized.
- Herbs Best Suited: Excellent for high-moisture herbs like basil, mint, tarragon, parsley, cilantro, and chives, as well as tougher herbs like rosemary and thyme.

Oven Drying: A Quick Alternative
When time is of the essence and you don’t have a dehydrator, your kitchen oven can serve as a viable, albeit less ideal, alternative for drying herbs. While it requires careful monitoring to prevent “cooking” the herbs, it can effectively remove moisture and preserve your harvest in a pinch.
The “Why” Behind Oven Drying
Ovens are designed for high-heat cooking, which is generally not suitable for herbs. However, by utilizing the lowest possible temperature setting and ensuring proper ventilation, an oven can mimic a dehydrator’s function by circulating warm, dry air. The challenge lies in maintaining a consistent low temperature and preventing the herbs from roasting or burning, which would destroy their flavor and potency.
Step-by-Step Procedure
- Preparation: Wash and thoroughly dry your herbs. Remove leaves from stems and arrange them in a single layer on baking sheets lined with parchment paper. Do not overlap.
- Preheat Oven: Set your oven to its absolute lowest temperature setting, typically around 170-200°F (75-95°C). If your oven has a “warm” setting, that’s even better.
- Ventilation: Prop the oven door open a few inches with a wooden spoon or heat-proof object. This allows moisture to escape and prevents the oven from getting too hot, facilitating air circulation.
- Drying Time: Place the baking sheets in the oven. Drying time can range from 1 to 4 hours, depending on the herb and oven.
- Monitoring and Flipping: Check the herbs every 15-30 minutes. Gently flip them to ensure even drying. Watch for any signs of browning or crisping that looks like cooking, not drying.
- Testing for Dryness: Herbs are dry when they are brittle, crumble easily, and show no flexibility.
Tips for Success and Common Pitfalls
- Lowest Temperature is Key: Never use an oven setting above 200°F (95°C) for drying herbs. Lower is always better.
- Consistent Monitoring: Oven drying requires your constant attention. Walk away for too long, and you risk burning your precious herbs.
- Door Propping: This step is critical for ventilation and temperature control. Without it, your oven will essentially bake the herbs.
- Herbs Best Suited: Works best for more robust herbs like rosemary, thyme, and oregano. High-moisture, delicate herbs like basil or cilantro are very challenging to oven dry without losing color and flavor.
- Energy Consumption: Keep in mind that running your oven for several hours with the door ajar can be energy-intensive.

Microwave Drying: For Small Batches
For those times when you need a small quantity of dried herbs quickly, or you’re experimenting with a new variety, the microwave can be a surprisingly effective method. It’s fast, efficient, and requires minimal setup, making it ideal for impromptu drying sessions.
The “Why” Behind Microwave Drying
Microwaves work by exciting water molecules, causing them to vibrate rapidly and generate heat, which then causes the water to evaporate. This method rapidly removes moisture from herbs. The key to successful microwave drying is using short bursts of power, allowing the moisture to dissipate between intervals, and preventing the herbs from overheating and “cooking.”
Step-by-Step Procedure
- Preparation: Wash and thoroughly pat dry your herbs. Remove leaves from stems. Place a single layer of herb leaves on a microwave-safe plate lined with a paper towel. Place another paper towel on top of the herbs.
- Microwave in Intervals: Microwave on high power for 30 seconds.
- Check and Continue: Remove the plate, check the herbs, and flip them. Continue microwaving in 15-30 second intervals, checking after each burst.
- Monitoring: Watch closely as herbs can go from perfectly dry to burnt very quickly. The total drying time will depend on the herb and your microwave’s wattage, typically ranging from 1 to 4 minutes.
- Testing for Dryness: Herbs are dry when they are brittle, crumbly, and easily shatter when touched.
Tips for Success and Common Pitfalls
- Small Batches Only: This method is not practical for large quantities of herbs. Stick to a handful of sprigs at a time.
- Paper Towels are Essential: They absorb the evaporating moisture, preventing the herbs from becoming soggy or steamy.
- Constant Vigilance: Never leave the microwave unattended during this process. Burning can happen rapidly.
- Herbs Best Suited: Works well for delicate, leafy herbs like parsley, cilantro, mint, and basil. Tougher herbs like rosemary might take longer and are better suited for other methods.
- Potential for Flavor Loss: While quick, some argue that the rapid heating can diminish some of the delicate essential oils compared to slower drying methods.

Preparing Dried Herbs for Long-Term Storage
Once your herbs are perfectly dried, the next critical step is preparing them for storage. Proper preparation ensures that the herbs retain their flavor, aroma, and potency for months, even up to a year or more. This stage is just as important as the drying itself, as incorrect storage can quickly undo all your hard work.
Crushing vs. Whole Leaves: When and Why
There’s an ongoing debate among herb enthusiasts about whether to store dried herbs whole or crushed. Each approach has its merits:
- Storing Whole Leaves: This is generally recommended for maximizing flavor and potency. The essential oils are protected within the intact leaf structure, only to be released when crushed or ground just before use. This minimizes exposure to air and light, which can degrade the oils over time.
- Storing Crushed/Ground Herbs: While convenient for immediate use, crushing or grinding herbs increases their surface area, exposing more essential oils to the air. This accelerates the loss of flavor and aroma. If you choose to store them crushed, aim for a coarse crush rather than a fine powder, and use them more quickly.
Recommendation: For optimal long-term preservation, store most herbs as whole leaves or small sprigs. Crush or grind them only when you’re ready to use them.
The Importance of Airtight Containers
Air is the enemy of dried herbs. Exposure to oxygen causes oxidation, leading to a loss of flavor, aroma, and color. Therefore, using truly airtight containers is paramount.
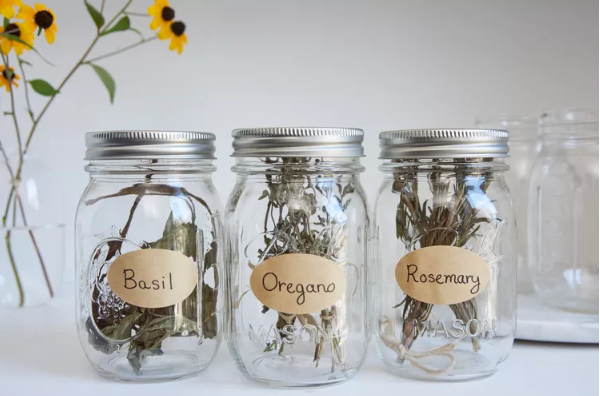
- Glass Jars: Mason jars with two-piece lids, or spice jars with tight-fitting caps, are excellent choices. Glass is non-reactive and provides a good seal.
- Metal Tins: Opaque metal tins with tight-fitting lids can also work well, especially if they are designed for food storage.
- Vacuum Sealing: For ultimate long-term storage, vacuum sealing can remove even more air, significantly extending shelf life.
Common Pitfall: Avoid plastic bags or containers that aren’t specifically designed for airtight food storage, as they can allow air to permeate over time.
Labeling for Success
It sounds simple, but proper labeling is often overlooked and can save you immense frustration later. Label each container with:
- Herb Name: Clearly identify the type of herb.
- Date Dried: This allows you to track freshness and rotate your stock.
- Drying Method (Optional): If you experiment with different methods, this can be useful for future reference.
A well-labeled pantry makes cooking a joy and ensures you’re always using herbs at their peak.

Optimal Storage Conditions and Shelf Life
Even perfectly dried and prepared herbs can lose their potency if not stored under the right conditions. Environmental factors such as light, heat, and humidity are major culprits in the degradation of flavor and aroma. Understanding and controlling these elements will ensure your dried herbs remain vibrant for as long as possible.
The “Why” Behind Specific Storage Conditions
- Darkness: Light, especially direct sunlight or strong artificial light, can break down the delicate essential oils and chlorophyll in herbs, leading to a rapid loss of color, flavor, and medicinal properties. This process is known as photodegradation.
- Cool Temperatures: Heat accelerates chemical reactions, including the oxidation of essential oils. Storing herbs in a cool environment slows down this degradation, helping them retain their freshness longer.
- Low Humidity: Any residual moisture or ambient humidity can be reabsorbed by dried herbs, making them susceptible to mold growth and spoilage. A dry environment is critical for maintaining their dehydrated state.
Ideal Storage Environment
- Pantry or Cabinet: A cool, dark pantry or kitchen cabinet, away from the stove, oven, or direct sunlight, is an ideal location.
- Basement/Cellar: If you have a cool, dry basement, it can be an excellent long-term storage spot.
- Refrigerator/Freezer (Not Recommended for Dried Herbs): While these are great for fresh herbs or certain preparations, they are generally not suitable for *dried* herbs due to the fluctuating humidity and potential for condensation, which can introduce moisture.
Typical Shelf Life of Dried Herbs
The shelf life of dried herbs varies depending on the herb type, drying method, and storage conditions. However, a general guideline is:
- Whole Dried Herbs: Up to 1 year. Herbs like rosemary, thyme, oregano, and sage can often retain good flavor for this period.
- Crushed or Ground Herbs: 6-8 months. Once crushed, the increased surface area means faster degradation.
- Delicate Leafy Herbs (e.g., Parsley, Cilantro, Basil): 6 months. These tend to lose their vibrancy more quickly than hardier herbs.
How to Check for Freshness: The best way to tell if your dried herbs are still potent is by their aroma. Rub a small amount between your fingers. If the aroma is weak or nonexistent, it’s time to replace them. Color can also be an indicator; dull, faded herbs often mean diminished flavor.

Common Mistakes and Troubleshooting
Even with the best intentions, drying and storing herbs can present challenges. Recognizing common pitfalls and knowing how to troubleshoot them will help you achieve consistently excellent results, ensuring your efforts are rewarded with flavorful, long-lasting herbs.
Mistake 1: Not Drying Herbs Thoroughly
The Problem: Herbs feel pliable, slightly soft, or retain any moisture. This is the most common cause of spoilage.
The Why: Any residual moisture, even a tiny amount, creates an environment conducive to mold and bacterial growth, leading to spoilage and a musty smell.
Troubleshooting:
- Re-dry Immediately: If you
Reader boundary: This guide is for general editorial information only. Diving, marine-wildlife, environmental, lighting, electrical, appliance, plant-care, and home-installation topics should be checked against current standards, manufacturer instructions, local rules, and qualified professionals before practical use.